Printing Digital Images on a Colour Printer
It is well worth the time to develop your skills so that you
can print quality images.
If you want great prints, use the highest quality for the files
for the images you save on your camera. Before you start making
prints, make a copy of each image you want to print so that you
are not messing with your original file. Load the copied image
into PhotoShop. You can make minor adjustments to the image before
you print it. If you make a mistake, you can always return to
the original.
Most images I print are 4” x 6”, at 720 dpi.(Note
that paper sizes are usually measured in inches.)
Before you print you must resize the image so that it will print
at the correct size. So, load the image, put in a width and height
that will fit on your paper, and enter the number of points per
inch that you will use on your printer.
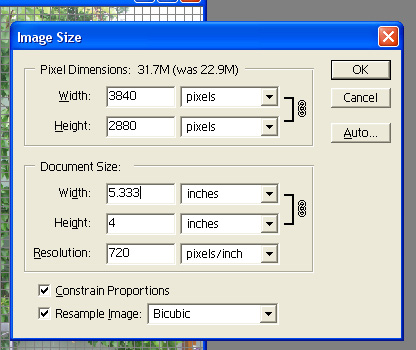
As you can see, the image size has grown from 22.9 M to 31.7 M.
When you print, use the same brand paper and ink as the brand
of your printer. The printer companies have made a lot of effort
to ensure you can get the best quality prints, so don’t
waste your time and money by messy around with substitute inks
and paper. You can obtain some interesting and unexpected effects
if you mix up your papers and inks.
Use photo-quality paper to bring out the vibrancy and sharpness
of your images.
Take care handling the images – try to avoid finger prints
and don’t leave them exposed to the air or strong sunlight
for extended periods of time. Hey, it doesn’t really matter
does it? You can always print another one.
I usually save the resized file so that if I do need another copy
of the image, I can load the file that I have already adjusted
and print another copy.
These days I use an Epson R210 that prints with six individual
colours. If I have only one or two quality prints to make, I use
the technique above. If I have to print a whole batch of images,
I copy the images I want to a new folder, adjust the levels within
each image so that they look good on the screen. Then I load the
software (Epson PhotoQuicker) that came with the printer and use
it to make the prints.
If you have a high quality colour printer, it will probably come
with printer software that will enable you to print very quickly
and easily. Usually all you have to do is select the paper size
and quality you have in the printer and the software will optimise
the printer to obtain the best quality print.